Master Your Flyff Experience Meistere dein Flyff Erlebnis Domine sua Experiência no Flyff Paghusayin ang Iyong Flyff Experience

The ultimate open-source multi-client manager with F-Tool. Der ultimative Open-Source Multi-Client Manager mit F-Tool. O melhor gerenciador de multi-clientes open-source com F-Tool. Ang pinakamahusay na open-source multi-client manager na may F-Tool.

What is Was ist das O que é o Ano ang Entropia Dashboard?

A powerful, free, and open-source application designed to streamline your Flyff gameplay. Eine leistungsstarke, kostenlose Open-Source-Anwendung zur Optimierung deines Flyff-Gameplays. Uma aplicação poderosa, gratuita e de código aberto projetada para otimizar seu jogo no Flyff. Isang malakas, libre, at open-source na aplikasyon na dinisenyo para mapadali ang iyong paglalaro ng Flyff.

Written in PowerShell, it offers robust client management, automated launch and logins, and a customizable F-Tool to enhance your efficiency without compromising security. Geschrieben in PowerShell, bietet es robustes Client-Management, automatischer Start und Login mit einem anpassbaren F-Tool, um deine Effizienz zu steigern, ohne die Sicherheit zu gefährden. Escrito em PowerShell, oferece gerenciamento robusto de clientes, inicialização e logins automatizados, e um F-Tool personalizável para aumentar sua eficiência sem comprometer a segurança. Nakasulat sa PowerShell, nag-aalok ito ng matibay na pamamahala ng kliyente, awtomatikong paglunsad at pag-login, at nako-customize na F-Tool upang mapahusay ang iyong kahusayan nang hindi isinasakripisyo ang seguridad.

Multi-Client Support Multi-Client Unterstützung Suporte Multi-Cliente Suporta sa Multi-Client
Auto Launch & Login Auto-Start & Login Launch e Login Automático Auto Launch at Login
Custom F-Tool Benutzerdefiniertes F-Tool F-Tool Personalizado Pasadyang F-Tool
Disconnect Monitor Verbindungsüberwachung Monitor de Desconexão Monitor ng Disconnect
Dashboard Interface

Guides & Documentation Anleitungen & Dokumentation Guias e Documentação Mga Gabay at Dokumentasyon

1. Initial Setup 1. Ersteinrichtung 1. Configuração Inicial 1. Paunang Pag-setup

Go to Settings > General. Click Browse and select your main Launcher.exe. This is the most important step! (Rename it if it has a different name.) Gehe zu Settings > General. Klicke auf Browse und wähle deine Launcher.exe. Das ist der wichtigste Schritt! (Benenne ihn, falls er anders heißt.) Vá para Settings > General. Clique em Browse e selecione seu Launcher.exe principal. Este é o passo mais importante! (Renomeie se tiver um nome diferente.) Pumunta sa Settings > General. I-click ang Browse at piliin ang iyong pangunahing Launcher.exe. Ito ang pinakamahalagang hakbang! (Palitan ang pangalan kung iba ito.)

Settings

2. Create Profiles 2. Profile erstellen 2. Criar Perfis 2. Gumawa ng mga Profile

In Settings, Create lightweight client profiles. After main launcher patches, use Copy Neuz.exe to update them all. Erstelle in den Settings leichtgewichtige Client-Profile. Nach Patches des Haupt-Launchers nutze Copy Neuz.exe, um alle zu Profile zu aktualisieren. Em Settings, Create perfis de cliente leves. Após atualizações do launcher principal, use Copy Neuz.exe para atualizar todos. Sa Settings, Create ng magaan na client profiles. Pagkatapos mag-patch ang main launcher, gamitin ang Copy Neuz.exe para i-update ang lahat.

Create Profiles

3. Set Login Points 3. Login-Punkte setzen 3. Definir Pontos de Login 3. Itakda ang Login Points

Go to Settings > Login Settings. Select a profile, click Set, then click on the corresponding button in-game to record its position. Gehe zu Settings > Login Settings. Wähle ein Profil, klicke auf Set und dann im Spiel auf den entsprechenden Button, um die Position zu speichern. Vá para Settings > Login Settings. Selecione um perfil, clique em Set, depois clique no botão correspondente no jogo para gravar sua posição. Pumunta sa Settings > Login Settings. Pumili ng profile, i-click ang Set, tapos i-click ang kaukulang button sa laro para ma-record ang posisyon nito.

Login Config

4. Use The F-Tool 4. Das F-Tool nutzen 4. Usar o F-Tool 4. Gamitin ang F-Tool

Select a client in the grid and click F-Tool. Set a key and interval, then press Start to automate key presses in the background. Wähle einen Client in der Liste und klicke auf F-Tool. Setze Taste und Intervall fest, dann drücke Start für automatisierte Tastendrücke im Hintergrund. Selecione um cliente na grade e clique em F-Tool. Defina uma tecla e intervalo, depois pressione Iniciar para automatizar pressionamentos de tecla em segundo plano. Pumili ng client sa grid at i-click ang F-Tool. Magtakda ng key at interval, tapos pindutin ang Start para i-automate ang pagpindot ng key sa background.

F-Tool Interface
Section 1: First-Time Setup (Single Client) Abschnitt 1: Ersteinrichtung (Einzelner Client) Seção 1: Configuração Inicial (Cliente Único) Seksyon 1: Unang Pag-setup (Isang Client)

This guide will walk you through the essential first steps to get one client running. This is the foundation for all other features. Diese Anleitung führt dich durch die ersten Schritte, um einen Client zum Laufen zu bringen. Dies ist die Grundlage für alle weiteren Funktionen. Este guia irá orientá-lo nos primeiros passos essenciais para colocar um cliente em funcionamento. Esta é a base para todos os outros recursos. Gagabayan ka ng gabay na ito sa mahahalagang unang hakbang para mapatakbo ang isang client. Ito ang pundasyon para sa lahat ng iba pang feature.

  1. Open Settings: Einstellungen öffnen: Abrir Configurações: Buksan ang Settings: Click the Settings button on the main dashboard. This is your control center for all configurations. Klicke auf den Settings-Button im Dashboard. Dies ist deine Zentrale für alle Konfigurationen. Clique no botão Settings no painel principal. Este é o seu centro de controle para todas as configurações. I-click ang Settings button sa main dashboard. Ito ang iyong control center para sa lahat ng configuration.
  2. Select Your Launcher: Wähle deinen Launcher: Selecione Seu Launcher: Piliin ang Iyong Launcher:
    • In the General tab, find "Select Main Launcher". Im Reiter General, finde "Select Main Launcher". Na aba Geral, encontre "Select Main Launcher". Sa General tab, hanapin ang "Select Main Launcher".
    • Click Browse and navigate to your Flyff game folder. Select the primary Launcher.exe for your server. Ensure the name is "Launcher". Klicke Browse, gehe zu deinem Flyff-Ordner und wähle die primäre Launcher.exe. Stelle sicher, dass der Name "Launcher" ist. Clique em Browse e navegue até a pasta do jogo Flyff. Selecione o Launcher.exe primário do seu servidor. Certifique-se de que o nome seja "Launcher". I-click ang Browse at pumunta sa iyong Flyff game folder. Piliin ang pangunahing Launcher.exe para sa iyong server. Siguraduhing "Launcher" ang pangalan.
    • Why? Warum? Por quê? Bakit? This tells the dashboard what to run. It's used as the "Default" launch path and the source for creating new profiles. Dies sagt dem Dashboard, was gestartet werden soll. Es dient als Standard-Pfad und Quelle für neue Profile. Isso diz ao dashboard o que executar. É usado como o caminho de inicialização "Default" e a fonte para criar novos perfis. Sinasabi nito sa dashboard kung ano ang patatakbuhin. Ginagamit ito bilang "Default" launch path at pinagmulan para sa paggawa ng mga bagong profile.
  3. Verify Process Name: Prozess-Namen prüfen: Verificar Nome do Processo: I-verify ang Process Name:
    • The "Process Name" field should automatically be set to neuz. This is the name of the main game client executable. Das Feld "Process Name" sollte automatisch auf neuz stehen. Dies ist der Name der Spiel-Executable. O campo "Process Names" deve ser definido automaticamente como neuz. Este é o nome do executável principal do cliente do jogo. Ang field na "Process Name" ay dapat awtomatikong nakatakda sa neuz. Ito ang pangalan ng main game client executable.
    • Only change this if your server uses a different process name for the game window. Ändere dies nur, wenn dein Server einen anderen Prozessnamen nutzt. Altere isso apenas se o seu servidor usar um nome de processo diferente para a janela do jogo. Baguhin lang ito kung gumagamit ang iyong server ng ibang process name para sa game window.
  4. Set Max Clients: Max Clients setzen: Definir Máximo de Clientes: Itakda ang Max Clients:
    • This number defines the total clients the dashboard will manage for the "Default Launch" sequence. It is recommended to leave it at 1. Diese Zahl definiert die Anzahl der Clients für den "Default Launch". Es wird empfohlen, sie auf 1 zu lassen. Este número define o total de clientes que o dashboard gerenciará para a sequência de "Default Launch". Recomenda-se deixá-lo em 1. Tinutukoy ng numerong ito ang kabuuang clients na pamamahalaan ng dashboard para sa "Default Launch" sequence. Inirerekomendang iwanan ito sa 1.
  5. Save Your Settings: Einstellungen speichern: Salvar Suas Configurações: I-save ang Iyong Settings: Click the green Save button at the bottom. Klicke den grünen Save-Button unten. Clique no botão verde Save na parte inferior. I-click ang berdeng Save button sa ibaba.
  6. Launch Your First Client: Starte deinen ersten Client: Iniciar Seu Primeiro Cliente: Ilunsad ang Iyong Unang Client:
    • Right-click the Launch button on the main dashboard. Rechtsklick auf den Launch-Button im Dashboard. Clique com o botão direito no botão Launch no painel principal. I-right click ang Launch button sa main dashboard.
    • A context menu will appear. Go to Default / Selected and click Start 1x. Ein Kontextmenü erscheint. Gehe zu Default / Selected und klicke Start 1x. Um menu de contexto aparecerá. Vá para Default / Selected e clique em Start 1x. Lilitaw ang isang context menu. Pumunta sa Default / Selected at i-click ang Start 1x.
    • Your game launcher should appear. Let it patch and start the game. The client will appear in the dashboard's grid. Dein Launcher sollte erscheinen. Lass ihn patchen und starte das Spiel. Der Client erscheint in der Dashboard-Liste. Seu launcher do jogo deve aparecer. Deixe-o atualizar e iniciar o jogo. O cliente aparecerá na grade do dashboard. Dapat lumitaw ang iyong game launcher. Hayaan itong mag-patch at simulan ang laro. Lilitaw ang client sa grid ng dashboard.
Section 2: Multi-Client Management with Profiles Abschnitt 2: Multi-Client Management mit Profilen Seção 2: Gerenciamento Multi-Cliente com Perfis Seksyon 2: Pamamahala ng Multi-Client gamit ang mga Profile

Profiles are the core of multi-clienting. Each profile is a lightweight, independent copy of your game client, allowing for separate settings, resolutions, and logins. Profile sind der Kern des Multi-Clientings. Jedes Profil ist eine leichtgewichtige, unabhängige Kopie deines Clients, die separate Einstellungen, Auflösungen und Logins ermöglicht. Perfis são o núcleo do multi-cliente. Cada perfil é uma cópia leve e independente do seu cliente de jogo, permitindo configurações, resoluções e logins separados. Ang mga profile ang core ng multi-clienting. Ang bawat profile ay isang magaan at independiyenteng kopya ng iyong game client, na nagbibigay-daan para sa hiwalay na settings, resolutions, at logins.

How it Works: The Magic of Junctions Wie es funktioniert: Die Magie der Junctions Como Funciona: A Magia das Junções Paano Ito Gumagana: Ang Mahika ng Junctions

Instead of copying the entire 16GB+ game folder, the dashboard creates NTFS Junctions. It links the huge Data and Effect folders back to your main client but creates real copies of essential files like neuz.ini and AccountInformation.bin. This means a new profile only uses about ~300MB of disk space! Statt den ganzen 16GB+ Ordner zu kopieren, erstellt das Dashboard NTFS Junctions. Es verlinkt die großen Data und Effect Ordner zum Hauptclient, kopiert aber wichtige Dateien wie neuz.ini und AccountInformation.bin. Ein neues Profil braucht so nur ca. 300MB! Em vez de copiar toda a pasta do jogo de 16GB+, o dashboard cria Junções NTFS. Ele vincula as enormes pastas Data e Effect de volta ao seu cliente principal, mas cria cópias reais de arquivos essenciais como neuz.ini e AccountInformation.bin. Isso significa que um novo perfil usa apenas cerca de ~300MB de espaço em disco! Sa halip na kopyahin ang buong 16GB+ na game folder, gumagawa ang dashboard ng NTFS Junctions. Inili-link nito ang malalaking Data at Effect folders pabalik sa iyong main client pero gumagawa ng totoong kopya ng mahahalagang files tulad ng neuz.ini at AccountInformation.bin. Ibig sabihin, ang isang bagong profile ay gumagamit lang ng humigit-kumulang ~300MB na disk space!

Creating and Managing Profiles: Profile erstellen und verwalten: Criando e Gerenciando Perfis: Paggawa at Pamamahala ng mga Profile:
  1. Set Profiles Folder: Profil-Ordner setzen: Definir Pasta de Perfis: Itakda ang Profiles Folder: 
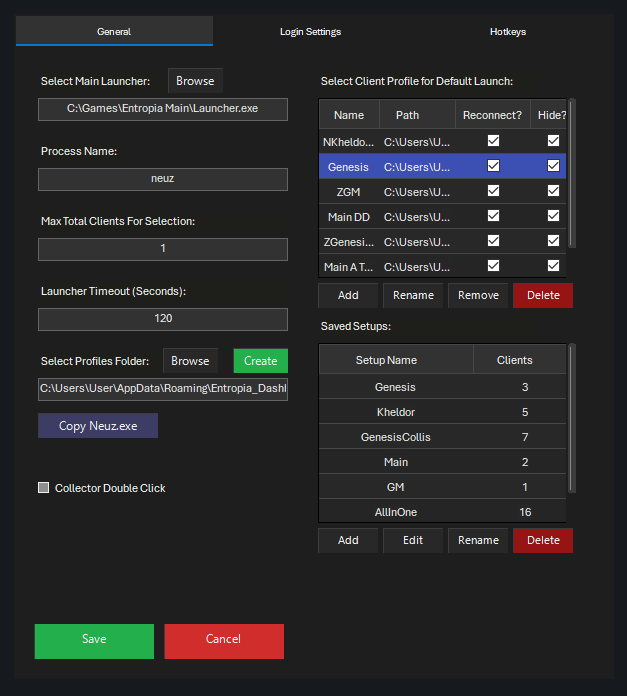
In Settings > General, the "Select Profiles Folder" path defaults to %APPDATA%\Entropia_Dashboard\Profiles. You can change this, but the default is recommended. In Settings > General ist der Pfad standardmäßig %APPDATA%\Entropia_Dashboard\Profiles. Du kannst dies ändern, Standard wird empfohlen. Em Settings > General, o caminho "Selecionar Pasta de Perfis" é padrão para %APPDATA%\Entropia_Dashboard\Profiles. Você pode alterar isso, mas o padrão é recomendado. Sa Settings > General, ang path ng "Select Profiles Folder" ay naka-default sa %APPDATA%\Entropia_Dashboard\Profiles. Pwede mo itong baguhin, pero inirerekomenda ang default.
  2. Create a New Profile: Neues Profil erstellen: Criar um Novo Perfil: Gumawa ng Bagong Profile: Click the green Create button. You'll be prompted to enter a name for your new profile (e.g., "Healer", "Buffer"). The dashboard will then create the lightweight copy for you. Klicke den grünen Create-Button. Gib einen Namen ein (z.B. "Healer"). Das Dashboard erstellt die Kopie. Clique no botão verde Create. Você será solicitado a inserir um nome para seu novo perfil (ex: "Healer", "Buffer"). O dashboard criará a cópia leve para você. I-click ang berdeng Create button. Hihilingin sa iyong maglagay ng pangalan para sa iyong bagong profile (hal., "Healer", "Buffer"). Gagawin ng dashboard ang magaan na kopya para sa iyo.
  3. The Profile Grid: Die Profil-Liste: A Grade de Perfis: Ang Profile Grid: Your new profile appears in the grid on the right. Here you can: Dein neues Profil erscheint rechts in der Liste. Hier kannst du: Seu novo perfil aparece na grade à direita. Aqui você pode: Lilitaw ang iyong bagong profile sa grid sa kanan. Dito maaari mong:
    • Select: Auswählen: Selecionar: Piliin: Use that profile for the Default / Selected Launch. Nutze dieses Profil für den Default / Selected Start. Use esse perfil para o Launch Default / Selected. Gamitin ang profile na iyon para sa Default / Selected Launch.
    • Add: Add: Add: Add: Manually add an existing folder as a profile. Füge manuell einen existierenden Ordner als Profil hinzu. Adicionar manualmente uma pasta existente como perfil. Manu-manong magdagdag ng umiiral na folder bilang profile.
    • Rename: Rename: Rename: Rename: Change the name of the selected profile. Ändere den Namen des Profils. Alterar o nome do perfil selecionado. Baguhin ang pangalan ng napiling profile.
    • Remove: Remove: Remove: Remove: Removes the profile from the list (does not delete files). Entfernt das Profil aus der Liste (löscht keine Dateien). Remove o perfil da lista (não exclui arquivos). Inaalis ang profile sa listahan (hindi binubura ang mga file).
    • Delete: Delete: Delete: Delete: Permanently deletes the profile folder from your hard drive. Use with caution! Löscht den Profilordner permanent von der Festplatte. Vorsicht! Exclui permanentemente a pasta do perfil do seu disco rígido. Use com cautela! Permanenteng binubura ang profile folder mula sa iyong hard drive. Gamitin nang may pag-iingat!
    • Reconnect? Reconnect? Reconnect? Reconnect? (See Section 4) Check this to enable the Smart Reconnect feature for this profile. (Siehe Abschnitt 4) Aktiviere dies für Smart Reconnect. (Veja Seção 4) Marque isso para ativar o recurso de Reconexão Inteligente para este perfil. (Tingnan ang Seksyon 4) I-check ito para paganahin ang Smart Reconnect feature para sa profile na ito.
    • Hide? Hide? Hide? Hide? Check this to hide the client from the taskbar and Alt+Tab view when it's minimized. Versteckt den Client aus Taskleiste und Alt+Tab, wenn minimiert. Marque isso para ocultar o cliente da barra de tarefas e da visualização Alt+Tab quando minimizado. I-check ito para itago ang client mula sa taskbar at Alt+Tab view kapag naka-minimize.
  4. CRITICAL STEP AFTER GAME PATCHES: WICHTIG NACH PATCHES: PASSO CRÍTICO APÓS ATUALIZAÇÕES DO JOGO: KRITIKAL NA HAKBANG PAGKATAPOS NG GAME PATCHES: If the game updates, your main client's and profiles neuz.exe are not synced, open the main Launcher to patch first. Then click the Copy Neuz.exe button to distribute the updated executable to all your profiles. Wenn das Spiel updatet, patche erst den Haupt-Launcher. Klicke dann Copy Neuz.exe, um die neue Datei auf alle Profile zu verteilen. Se o jogo atualizar, o neuz.exe do seu cliente principal e perfis não estarão sincronizados, abra o Launcher principal para atualizar primeiro. Em seguida, clique no botão Copy Neuz.exe para distribuir o executável atualizado para todos os seus perfis. Kung mag-update ang laro, at hindi naka-sync ang neuz.exe ng iyong main client at mga profile, buksan muna ang main Launcher para mag-patch. Pagkatapos ay i-click ang Copy Neuz.exe button para ipamahagi ang updated na executable sa lahat ng iyong profile.
  5. Launching a Profile Client: Profil starten: Lançando um Cliente de Perfil: Paglulunsad ng Profile Client: Right-click the Launch button, find your profile name in the menu (e.g., "Healer"), and select how many instances to start. Rechtsklick auf Launch, finde dein Profil im Menü und wähle die Anzahl der Clients. Clique com o botão direito no botão Launch, encontre o nome do seu perfil no menu (ex: "Healer") e selecione quantas instâncias iniciar. I-right click ang Launch button, hanapin ang pangalan ng iyong profile sa menu (hal., "Healer"), at piliin kung ilang instances ang sisimulan.
Section 3: The Main Dashboard Explained Abschnitt 3: Das Dashboard erklärt Seção 3: O Painel Principal Explicado Seksyon 3: Ang Main Dashboard Ipinaliwanag
The Client Grid Die Client-Liste A Grade de Clientes Ang Client Grid

This is your main view of all running game clients. It shows: Dies ist die Hauptansicht aller laufenden Clients. Sie zeigt: Esta é sua visão principal de todos os clientes de jogo em execução. Ela mostra: Ito ang iyong pangunahing view ng lahat ng tumatakbong game clients. Ipinapakita nito:

  • #: The account number used for login automation (1-10). Die Account-Nummer für den Auto-Login (1-10). O número da conta usado para automação de login (1-10). Ang account number na ginagamit para sa login automation (1-10).
  • Title: Titel: Title: Title: The window title. It will show the profile name in brackets, like [Healer], if applicable. Fenstertitel. Zeigt ggf. den Profilnamen in Klammern, z.B. [Healer]. O título da janela. Mostrará o nome do perfil entre colchetes, como [Healer], se aplicável. Ang pamagat ng window. Ipapakita nito ang pangalan ng profile sa loob ng brackets, tulad ng [Healer], kung naaangkop.
  • PID: The unique Process ID of the client. Die eindeutige Prozess-ID. O ID de Processo único do cliente. Ang natatanging Process ID ng client.
  • State: State: State: State: The client's current status (e.g., Normal, Minimized, Loading...). Aktueller Status (z.B. Normal, Minimized, Loading...). O status atual do cliente (ex: Normal, Minimized, Loading...). Ang kasalukuyang status ng client (hal., Normal, Minimized, Loading...).
  • Advanced notification: Benachrichtigung: Notificação Avançada: Advanced notification: The client's row will blink yellow if you recieve a message ingame and change its color to red if it gets disconnected. Die Zeile blinkt gelb bei Ingame-Nachrichten und wird rot bei Disconnects. A linha do cliente piscará em amarelo se você receber uma mensagem no jogo e mudará para vermelho se for desconectado. Ang row ng client ay kukurap ng dilaw kung makakatanggap ka ng mensahe sa laro at magiging pula kung madidiskonekta ito.
Interacting with the Grid: Interaktion mit der Liste: Interagindo com a Grade: Pakikipag-ugnayan sa Grid:

  • Selection: Auswahl: Seleção: Pagpili: Click any client to select it. You can select multiple clients by holding Ctrl while clicking, or select a range of clients by clicking the first one and dragging, or holding Shift, and clicking the last one. Most actions (Login, F-Tool, Terminate) apply to all selected clients. Klicke zum Auswählen. Halte Ctrl für Mehrfachauswahl oder Shift. Aktionen (Login, F-Tool, Terminate) gelten für alle ausgewählten Clients. Clique em qualquer cliente para selecioná-lo. Você pode selecionar vários clientes segurando Ctrl enquanto clica, ou selecionar um intervalo de clientes clicando no primeiro e arrastando, ou segurando Shift e clicando no último. A maioria das ações (Login, F-Tool, Terminate) se aplica a todos os clientes selecionados. I-click ang anumang client para piliin ito. Maaari kang pumili ng maraming client sa pamamagitan ng pag-hold ng Ctrl habang nagki-click, o pumili ng range ng clients sa pamamagitan ng pag-click sa una at pag-drag, o pag-hold ng Shift, at pag-click sa huli. Karamihan sa mga aksyon (Login, F-Tool, Terminate) ay naaangkop sa lahat ng napiling clients.
  • Double-Click: Doppelklick: Clique Duplo: Double-Click: Double-clicking on any client is a shortcut to bring its window to the foreground (same as the "Show" action). Bringt das Fenster in den Vordergrund (wie "Show"). Clicar duas vezes em qualquer cliente é um atalho para trazer sua janela para o primeiro plano (o mesmo que a ação "Show"). Ang pag-double click sa anumang client ay shortcut para dalhin ang window nito sa foreground (katulad ng "Show" action).
  • Right-Click Context Menu: Rechtsklick-Menü: Menu de Contexto do Botão Direito: Right-Click Context Menu: Right-clicking a client gives you quick actions: Rechtsklick auf einen Client bietet Schnellaktionen: Clicar com o botão direito em um cliente oferece ações rápidas: Ang pag-right click sa isang client ay nagbibigay sa iyo ng mabilis na mga aksyon:
    • Show Show Show Show: Brings the client window to the foreground. Holt das Fenster nach vorne. Traz a janela do cliente para o primeiro plano. Dinadala ang client window sa foreground.
    • Minimize Minimize Minimize Minimize: Minimizes the client window. Minimiert das Fenster. Minimiza a janela do cliente. Mini-minimize ang client window.
    • Resize Resize Resize Resize: Resizes the window to a standard 1024x768 and centers it, useful for fixing layout issues. Setzt Fenster auf 1024x768 und zentriert es (hilft bei Layout-Problemen). Redimensiona a janela para um padrão 1024x768 e a centraliza, útil para corrigir problemas de layout. Rini-resize ang window sa standard na 1024x768 at isinisentro ito, kapaki-pakinabang para sa pag-aayos ng mga isyu sa layout.
  • Delete Key Entf-Taste Tecla Delete Delete Key: Moves the selected client to the bottom of the grid. Verschiebt den Client ans Ende der Liste. Move o cliente selecionado para o final da grade. Inililipat ang napiling client sa ibaba ng grid.
Action Buttons Aktions-Buttons Botões de Ação Action Buttons
  • Launch:
    • Left-Click: Linksklick: Clique Esquerdo: Left-Click: Cancels an active launch sequence. The button will be labeled "Cancel Launch" during a sequence. Bricht Startsequenz ab (Button heißt dann "Cancel Launch"). Cancela uma sequência de inicialização ativa. O botão será rotulado como "Cancel Launch" durante uma sequência. Kinakansela ang isang aktibong launch sequence. Ang button ay lalagyan ng label na "Cancel Launch" habang may sequence.
    • Right-Click: Rechtsklick: Clique Direito: Right-Click: Opens the launch context menu. This menu dynamically shows you options to: Öffnet Start-Menü mit Optionen für: Abre o menu de contexto de inicialização. Este menu mostra dinamicamente opções para: Binubuksan ang launch context menu. Ang menu na ito ay dinamikong nagpapakita sa iyo ng mga opsyon upang:
      • Launch the default number of clients for the currently selected profile. Starten der Standard-Anzahl für das gewählte Profil. Iniciar o número padrão de clientes para o perfil selecionado atualmente. Ilunsad ang default na bilang ng mga client para sa kasalukuyang napiling profile.
      • Launch a specific number of clients (1-10) for the "Default" client or any named profile via sub-menus. Starten einer bestimmten Anzahl (1-10) für Standard oder Profile. Iniciar um número específico de clientes (1-10) para o cliente "Padrão" ou qualquer perfil nomeado via submenus. Ilunsad ang isang tiyak na bilang ng mga client (1-10) para sa "Default" client o anumang pinangalanang profile sa pamamagitan ng sub-menus.
      • Restore a full session using the "Start and Login saved One-Click configuration" option Wiederherstellen einer Sitzung via "One-Click Konfiguration" (see Section 4). (siehe Abschnitt 4). Restaurar uma sessão completa usando a opção "Start and Login saved One-Click configuration" I-restore ang isang buong session gamit ang "Start and Login saved One-Click configuration" option
  • Login: Starts the auto-login sequence for the selected clients in the grid. If you want to login account >5, you MUST have 10 accounts in the list. Startet Auto-Login für ausgewählte Clients. Wenn du >5 Accounts einloggen möchtest, MÜSSEN 10 Accounts in der Liste sein. Inicia a sequência de login automático para os clientes selecionados na grade. Se você quiser logar em mais de 5 contas, você DEVE ter 10 contas na lista. Sinisimulan ang auto-login sequence para sa mga napiling client sa grid. Kung gusto mong mag-login ng higit sa >5 account, KAILANGAN may 10 account ka sa listahan.
  • F-Tool: Opens the F-Tool window for each selected client. Öffnet F-Tool für gewählte Clients. (see Section 5) (siehe Abschnitt 5) Abre a janela do F-Tool para cada cliente selecionado. Binubuksan ang F-Tool window para sa bawat napiling client.
  • Settings: Opens the main settings window. Öffnet das Einstellungsfenster. Abre a janela de configurações principais. Binubuksan ang main settings window.
  • Terminate: Instantly and forcefully closes all selected clients. Schließt gewählte Clients sofort erzwungen. Fecha instantânea e forçadamente todos os clientes selecionados. Agad at sapilitang isinasara ang lahat ng napiling client.
Section 4: Login Automation Deep Dive Abschnitt 4: Login-Automatisierung Details Seção 4: Aprofundamento na Automação de Login Seksyon 4: Malalim na Pagsusuri sa Login Automation

The login system is powerful but requires careful setup. It works by recording the screen position of buttons relative to the game window, so it works at any resolution. Das Login-System ist mächtig, braucht aber Einrichtung. Es speichert Button-Positionen relativ zum Fenster, funktioniert also bei jeder Auflösung. O sistema de login é poderoso, mas requer configuração cuidadosa. Ele funciona gravando a posição dos botões na tela em relação à janela do jogo, então funciona em qualquer resolução. Ang login system ay malakas pero nangangailangan ng maingat na pag-setup. Gumagana ito sa pamamagitan ng pag-record ng posisyon ng mga button sa screen na relative sa game window, kaya gumagana ito sa anumang resolution.

  1. Go to Settings > Login Settings. Gehe zu Settings > Login Settings. Vá para Settings > Login Settings. Pumunta sa Settings > Login Settings.
  2. Select a Profile to Edit: Profil wählen: Selecione um Perfil para Editar: Pumili ng Profile na I-eedit: Use the "Edit Profile" dropdown to choose which profile's login settings you want to configure. You can have different login coordinates and character choices for each profile! Nutze das Dropdown, um ein Profil zu bearbeiten. Jedes Profil kann eigene Koordinaten und Charaktere haben! Use o menu suspenso "Edit Profile" para escolher quais configurações de login de perfil você deseja configurar. Você pode ter diferentes coordenadas de login e escolhas de personagem para cada perfil! Gamitin ang "Edit Profile" dropdown para piliin kung aling login settings ng profile ang gusto mong i-configure. Pwede kang magkaroon ng magkakaibang login coordinates at character choices para sa bawat profile!
  3. Set Coordinates: Koordinaten setzen: Definir Coordenadas: Itakda ang Coordinates: For each item (e.g., "Server 1", "Channel 1", "Char Slot 1"), click the Set button. Klicke für jedes Element (z.B. "Server 1") auf Set. Para cada item (ex: "Server ", "Channel 1", "Char Slot 1"), clique no botão Set. Para sa bawat item (hal., "Server 1", "Channel 1", "Char Slot 1"), i-click ang Set button.
    • A prompt will appear. Click OK. Ein Hinweis erscheint. Klicke OK. Um aviso aparecerá. Clique em OK. Lilitaw ang isang prompt. I-click ang OK.
    • You have 3 seconds to focus your game client and move your mouse over the target button (e.g., the first server in the list). Du hast 3 Sekunden, um das Spiel zu fokussieren und die Maus über den Button zu halten. Você tem 3 segundos para focar seu cliente de jogo e mover o mouse sobre o botão alvo (ex: o primeiro servidor na lista). Mayroon kang 3 segundo para i-focus ang iyong game client at itapat ang iyong mouse sa target button (hal., ang unang server sa listahan).
    • The dashboard will record the coordinates. Repeat for all necessary buttons. Das Dashboard speichert die Koordinaten. Wiederhole dies für alle Buttons. O dashboard gravará as coordenadas. Repita para todos os botões necessários. Ire-record ng dashboard ang coordinates. Ulitin para sa lahat ng kinakailangang buttons.
  4. Configure Login Grid: Login-Tabelle konfigurieren: Configurar Grade de Login: I-configure ang Login Grid: This grid tells the dashboard which character to log into for each client slot (1 through 10). Diese Tabelle bestimmt, welcher Charakter für welchen Slot (1-10) eingeloggt wird. Esta grade diz ao dashboard em qual personagem logar para cada slot de cliente (1 a 10). Sinasabi ng grid na ito sa dashboard kung aling character ang ila-log in para sa bawat client slot (1 hanggang 10).
    • Client #: Corresponds to the account number in your nickname list. Entspricht der Nummer in deiner Account-Liste. Corresponde ao número da conta na sua lista de apelidos. Tumutugma sa account number sa iyong nickname list.
    • Server/Channel/Character: Click these cells to cycle through options (e.g., Server 1/2, Channel 1/2, Character 1/2/3). Klicke zum Durchschalten der Optionen. Clique nessas células para alternar entre as opções (ex: Server 1/2, Channel 1/2, Character 1/2/3). I-click ang mga cell na ito para magpalipat-lipat sa mga opsyon (hal., Server 1/2, Channel 1/2, Character 1/2/3).
    • Collecting?: If "Yes", the dashboard will perform an extra click on the "Collector Start" coordinates after logging in. Bei "Yes" klickt das Dashboard nach Login zusätzlich auf "Collector Start". Se "Yes", o dashboard realizará um clique extra nas coordenadas de "Collector Start" após o login. Kung "Yes", magsasagawa ang dashboard ng dagdag na click sa "Collector Start" coordinates pagkatapos mag-log in.
  5. Save! Speichern! Salvar! I-save! Click the main Save button. Klicke den Save-Button. Clique no botão Save principal. I-click ang main Save button.
Section 5: Mastering the F-Tool Abschnitt 5: Das F-Tool meistern Seção 5: Dominando o F-Tool Seksyon 5: Pag-master sa F-Tool

The F-Tool sends background keypresses to a specific client, allowing you full control. Das F-Tool sendet Hintergrund-Tastendrücke an einen spezifischen Client. O F-Tool envia pressionamentos de tecla em segundo plano para um cliente específico, permitindo controle total. Nagpapadala ang F-Tool ng background keypresses sa isang partikular na client, na nagbibigay sa iyo ng buong kontrol.

  • Opening the F-Tool: F-Tool öffnen: Abrindo o F-Tool: Pagbubukas ng F-Tool: Select one or more clients in the grid and click the F-Tool button. A separate tool window will appear for each, attached to its client. All Settings are saved per character! Wähle Clients und klicke F-Tool. Ein Fenster öffnet sich pro Client. Einstellungen werden pro Charakter gespeichert! Selecione um ou mais clientes na grade e clique no botão F-Tool. Uma janela de ferramenta separada aparecerá para cada um, anexada ao seu cliente. Todas as configurações são salvas por personagem! Pumili ng isa o higit pang client sa grid at i-click ang F-Tool button. Lilitaw ang isang hiwalay na tool window para sa bawat isa, na nakakabit sa client nito. Ang lahat ng Settings ay naka-save kada character!
  • Main Ftool: Haupt-Ftool: Ftool Principal: Pangunahing Ftool:
    • Key: Click to capture a keyboard or mouse button to send to the client. Klicke zum Erfassen einer Taste oder Maustaste. Clique para capturar um botão do teclado ou mouse para enviar ao cliente. I-click para i-capture ang keyboard o mouse button na ipapadala sa client.
    • Interval: The delay in milliseconds between each keypress. Verzögerung in Millisekunden. O atraso em milissegundos entre cada pressionamento de tecla. Ang delay sa milliseconds sa pagitan ng bawat keypress.
    • Name: The name of this Ftool. Name dieses F-Tools. O nome deste Ftool. Ang pangalan ng Ftool na ito.
    • Start/Stop: Manually start or stop the Ftool. Manuelles Starten/Stoppen. Iniciar ou parar manualmente o Ftool. Manu-manong simulan o itigil ang Ftool.
    • Hotkey: Assign a hotkey to start/stop this specific Ftool. Taste zum Starten/Stoppen zuweisen. Atribuir um atalho para iniciar/parar este Ftool específico. Magtalaga ng hotkey para simulan/itigil ang partikular na Ftool na ito.
  • Extensions: Erweiterungen: Extensões: Extensions: Click the + button to add more Ftools to the same client, each with its own key, interval, and hotkey. Klicke +, um weitere F-Tools für denselben Client hinzuzufügen. Clique no botão + para adicionar mais Ftools ao mesmo cliente, cada um com sua própria tecla, intervalo e atalho. I-click ang + button para magdagdag ng higit pang Ftools sa parehong client, bawat isa ay may sariling key, interval, at hotkey.
  • Global Hotkey Globaler Hotkey Atalho Global Global Hotkey(): At the top of the F-Tool window, you can set a "Master Hotkey". It enables or disables ALL other hotkeys for that specific F-Tool instance. This is useful for temporarily typing the Hotkey without stopping the Ftool. Setze oben einen "Master Hotkey". Er aktiviert/deaktiviert ALLE Hotkeys dieser Instanz. Nützlich, um die Taste zu tippen, ohne das Tool zu stoppen. No topo da janela do F-Tool, você pode definir um "Atalho Mestre". Ele ativa ou desativa TODOS os outros atalhos para essa instância específica do F-Tool. Isso é útil para digitar temporariamente o Atalho sem parar o Ftool. Sa itaas ng F-Tool window, pwede kang magtakda ng "Master Hotkey". Ineenable o dini-disable nito ang LAHAT ng iba pang hotkeys para sa partikular na F-Tool instance na iyon. Kapaki-pakinabang ito para sa pansamantalang pag-type ng Hotkey nang hindi itinitigil ang Ftool.
  • Collapse/Expand Einklappen/Ausklappen Recolher/Expandir I-collapse/I-expand ( / ): Minimizes the F-Tool window to a small bar. Minimiert das Fenster auf eine Leiste. Minimiza a janela do F-Tool para uma pequena barra. Mini-minimize ang F-Tool window sa isang maliit na bar.
Section 6: Advanced Features Abschnitt 6: Erweiterte Funktionen Seção 6: Recursos Avançados Seksyon 6: Mga Advanced na Feature
Smart Reconnect

The dashboard monitors each client's network connections. If a client who was in-game suddenly loses its connection, a notification will appear. Das Dashboard überwacht Verbindungen. Verliert ein Client im Spiel die Verbindung, erscheint eine Benachrichtigung. O dashboard monitora as conexões de rede de cada cliente. Se um cliente que estava no jogo perder repentinamente sua conexão, uma notificação aparecerá. Minomonitor ng dashboard ang network connections ng bawat client. Kung ang isang client na nasa laro ay biglang mawalan ng koneksyon, lilitaw ang isang notification.

  • Enable: Aktivieren: Ativar: I-enable: In Settings > General, check the "Reconnect?" box for each profile you want to enable this feature on. In Settings > General, aktiviere "Reconnect?" beim Profil. Em Settings > General, marque a caixa "Reconectar?" para cada perfil em que deseja ativar este recurso. Sa Settings > General, i-check ang "Reconnect?" box para sa bawat profile na gusto mong paganahin ang feature na ito.
  • Notification: Benachrichtigung: Notificação: Notification: When a disconnect is detected, you'll see a popup with options: Bei Disconnect erscheint ein Popup mit Optionen: Quando uma desconexão for detectada, você verá um popup com opções: Kapag may na-detect na disconnect, makakakita ka ng popup na may mga opsyon:
    • Reconnect Now Reconnect Now Reconnect Now Reconnect Now: Immediately starts the login sequence for that client. Startet sofort den Login. Inicia imediatamente a sequência de login para aquele cliente. Agad na sinisimulan ang login sequence para sa client na iyon.
    • Reconnect in 2m Reconnect in 2m Reconnect in 2m Reconnect in 2m: Delays the reconnect attempt. Verzögert den Versuch. Atrasa a tentativa de reconexão. Inaantala ang pagtatangkang mag-reconnect.
    • Dismiss All Dismiss All Dismiss All Dismiss All: Closes all active disconnect notifications. To stop a single Reconnect, close the notofication with X. Schließt alle Benachrichtigungen. Einzeln schließen mit X. Fecha todas as notificações de desconexão ativas. Para parar uma única Reconexão, feche a notificação com X. Isinasara ang lahat ng aktibong disconnect notifications. Para itigil ang isang Reconnect, isara ang notification gamit ang X.
  • If enabled, the client will automatically try to reconnect after 15 seconds unless you interact with the notification. Else you will just get notified. Wenn aktiv, verbindet der Client nach 15s automatisch neu, außer du interagierst. Sonst kommt nur eine Benachrichtigung. Se ativado, o cliente tentará reconectar automaticamente após 15 segundos, a menos que você interaja com a notificação. Caso contrário, você apenas será notificado. Kung naka-enable, awtomatikong susubukan ng client na mag-reconnect pagkalipas ng 15 segundo maliban kung makipag-ugnayan ka sa notification. Kung hindi, aabisuhan ka lang.

One-Click Setup (Session Restore) One-Click Setup (Sitzungswiederherstellung) One-Click Setup (Session Restore) One-Click Setup (Session Restore)

This feature lets you save your entire running client setup and restore it with a single click. Speichere dein gesamtes Client-Setup und stelle es mit einem Klick wieder her. Este recurso permite salvar toda a configuração do cliente em execução e restaurá-la com um único clique. Hinahayaan ka ng feature na ito na i-save ang iyong buong tumatakbong client setup at i-restore ito sa isang click.

  1. Save State: Zustand speichern: Salvar Estado: I-save ang State: Once you have all your clients launched and logged in exactly as you want them (e.g., 1 main, 3 buffers, 4 vendors), go to Settings > General and click Save One-Click Setup. This saves a snapshot of which profiles are running and which are fully logged in. Wenn alle Clients laufen und eingeloggt sind, gehe zu Settings > General und klicke Save One-Click Setup. Dies speichert Profile und Login-Status. Depois de ter todos os seus clientes lançados e logados exatamente como você deseja (ex: 1 principal, 3 buffers, 4 vendedores), vá para Settings > General e clique em Save One-Click Setup. Isso salva um instantâneo de quais perfis estão sendo executados e quais estão totalmente logados. Kapag nailunsad at nai-log in mo na ang lahat ng iyong clients nang eksakto kung paano mo sila gusto (hal., 1 main, 3 buffers, 4 vendors), pumunta sa Settings > General at i-click ang Save One-Click Setup. Sine-save nito ang snapshot kung aling mga profile ang tumatakbo at kung alin ang ganap na naka-log in.
  2. Restore State: Wiederherstellen: Restaurar Estado: I-restore ang State: Later, after closing your clients, right-click the Launch button and select Start and Login saved One-Click configuration. The dashboard will automatically launch the correct number of clients that are not running at this moment for each profile and then run the login script only for those that were logged in when you saved the state. Rechtsklick auf Launch und wähle Start and Login saved One-Click configuration. Das Dashboard startet fehlende Clients und loggt die ein, die beim Speichern eingeloggt waren. Mais tarde, após fechar seus clientes, clique com o botão direito no botão Lançar e selecione Start and Login saved One-Click configuration. O dashboard iniciará automaticamente o número correto de clientes que não estão sendo executados neste momento para cada perfil e, em seguida, executará o script de login apenas para aqueles que estavam logados quando você salvou o estado. Sa huli, pagkatapos isara ang iyong mga client, i-right click ang Launch button at piliin ang Start and Login saved One-Click configuration. Awtomatikong ilulunsad ng dashboard ang tamang bilang ng mga client na hindi tumatakbo sa sandaling ito para sa bawat profile at pagkatapos ay patatakbuhin ang login script para lamang sa mga naka-log in noong na-save mo ang state.

Get the latest version of Entropia Dashboard Hole dir die neueste Version des Entropia Dashboards Obtenha a versão mais recente do Entropia Dashboard Kunin ang pinakabagong bersyon ng Entropia Dashboard

Download for Windows Download für Windows Baixar para Windows I-download para sa Windows

Requires PowerShell 5.1+ and .NET Framework 4.6.2+ Benötigt PowerShell 5.1+ und .NET Framework 4.6.2+ Requer PowerShell 5.1+ e .NET Framework 4.6.2+ Nangangailangan ng PowerShell 5.1+ at .NET Framework 4.6.2+

Join the Community Tritt der Community bei Junte-se à Comunidade Sumali sa Komunidad